• (780) 489-6428
  • This email address is being protected from spambots. You need JavaScript enabled to view it.

Membership Registration Announcement - Front Page

When registering, you will not be prompted for payment until the end of the process, but you do not have to pay online. Once you have completed all of the registrations steps and provided your information, you can leave the screen and pay via e-transfer (information on how to do this is provided at the end of the registration process) or with a debit card or cash or cheque in the curling office, or call Cathy at 780-489-6428 and pay on the telephone.

If you want to pay online at the end of the registration process, you can pay with a Visa or Mastercard. Please click the blue button select to pay either the $100 deposit or the full fee.
If you pay the $100 deposit, this amount will be deducted from your balance owing when you pay the remainder of your fees. 


Other members can see your listed phone number so they can contact you directly (call or text) should they need to. Your email address will be hidden even when another member emails you. He/she will only be able to see your address if and when you respond to the email to you.


Yes. This is our means of communication to you. It also gives us useful information to understand a broader picture of who curls at JPCC. This is valuable for us, for Curling Alberta and even for sponsors who want to know the types of individuals their messages are reaching. No personal information is shared with outside organizations or individuals. Only aggregate statistics compiled from all our members are shared.


Yes. This includes the autonomous leagues and the seniors’ leagues. This ensures we have proper contact information for you, and other details now required by Curling Alberta.

If you don’t have access to a computer, call Cathy at 780-489-6428 to make special arrangements.


Your Member Profile displays the information that we know about you. Especially in times of COVID, we rely
on you to ensure your personal and contact information is kept up to date as we may need to reach you or
your Emergency Contact throughout the season.  

To update your Profile, including email address, Emergency Contact Information and other personal information.  

Go to:  Login to your  Member's Home menu from the secure part of the site.  

Select: My Information.
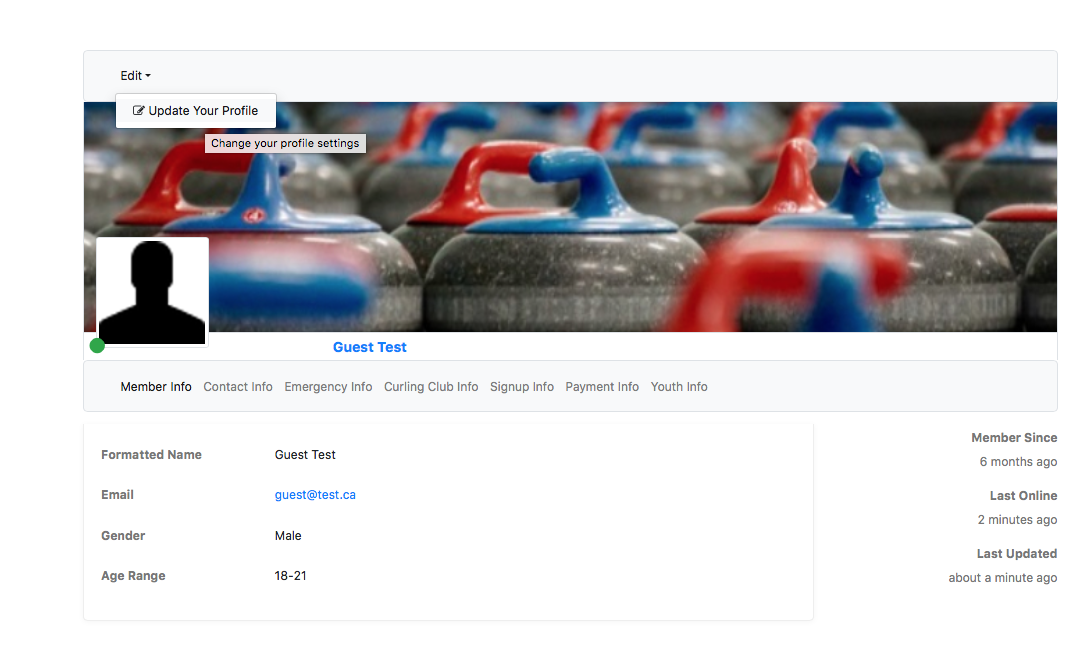
Click Edit 

Select Update Your Profile.

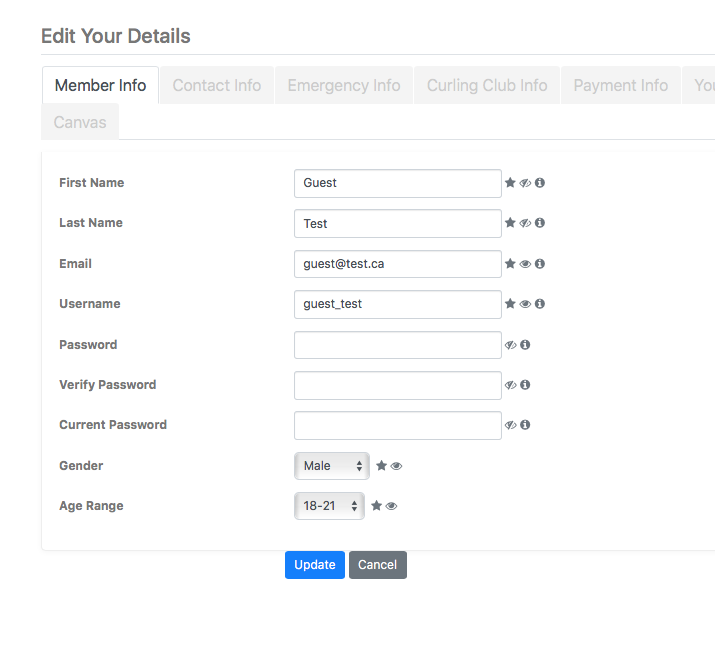
Once there, click on the appropriate TAB from the menu below your name.

Profile Tabs2

These include: 

  • Member Info - update your Name, email address, user name, password, age 
  • Contact Info - mailing address, phone numbers
  • Emergency Info - your emergency contact details
  • Curling Info - Locker number, membership status*, and curling experience, coaching level if applicable. 
  • Payment Info - much of this is automatically generated by the system, when you make a payment.  If you notice an anomaly, best to call the office. 
  • Youth Info - applied to Youth Members, contains parent/guardian & additional emergency information.
  • Signup Info - refers to any fees you may have paid during the Signup (registration) process.  Any anomalies should be brought to the attention of the office.

Update the information as needed.  Anything 'greyed' or otherwise not 'open' to edit, will need to be changed in the office. 

Don't forget to save your changes by clicking on UPDATE at the bottom!    CANCEL will close the edit screen without your changes.


USERNAMES

Did you know that you can change your username? 

Background - When we initially populated our member database we created usernames all in the format of 'firstname-lastname'.  

How do you change your username?

Similar to how you can change your password, you must be logged into your member account on the website to change your username.

Select the 'My Information' option from the MEMBER'S HOME menu. 

Make sure you click on the tab for "Member Info".

Then, look just above your profile picture, top right above the picture of the curling rocks.... mouseover (move your cursor over) the word 'Edit' and click on 'Update my Profile'. 

Screen Shot Update Profile 1

This action will open up each of the fields that you may edit on your profile.  

Screen Shot update profile2
Type in the username you wish to use, and then click on the blue UPDATE button at the bottom.  

Don't forget to make a note of the change, as you will need to use the new username next time you open the CCM APP on your mobile device as well.  

Did you know that Usernames are NOT case sensitive, but Passwords are?  

Example:  Username is First-Last 

It won't matter if you type FIRST-LAST  or first-last  or any combination of lower and upper case letters, the system will still log you in as long as your password is entered EXACTLY as you typed it when you first set it up.  


Since most ISP companies use spam filters, please add our email address to your list of Approved Senders or Contacts. This process is commonly known as Whitelisting.

If you do not see an email from us in your inbox (due to the overzealous filtering by ISPs) our email may have been sent to your spam folder. Please open your spam folder look for it there, open it and mark it as "not spam".

Refer to the list below for your ISP or your Email Client and find corresponding section below to see how to add our email address to the "Approved" or "Safe"  Senders list.
If not listed here, you may try GOOGLE to find the instructions for your specific service or version.  Search on Whitelist, Safe Senders or Approved Senders for your emaiil service provider.

You may also wish to GOOGLE to find more recent information for your specific service provider, as these can change with new versions and we cannot keep up with them all!   We have found instructions for some of the more popular email service providers, email clients, and spam filters that you may find helpful.

ISPs and Web-Based Email Providers:
AOL Web Mail
Xplornet
Yahoo!
Hotmail Live, Windows Live and MSN
Gmail
Shaw
Bell/Sympatico
Rogers
Telus

Email Clients:
Outlook 2003 (or higher)
Blackberrys
Mozilla Thunderbird
Apple Mail

Spam Filters:
Norton AntiSpam
McAfee Spamkiller
Barracuda Networks
Trend Micro PC-Cillin
Cloudmark SpamNet
Mailblocks
MailShield
MailWasher
Oddpost
SpamAssasin
SpamFighter
Spam Arrest
ChoiceMail
SpamButcher
Spameater Pro
Spam Inspector
Spam Interceptor
SpamPal
Spam Sleuth
Other Providers

EMAIL PROVIDERS

AOL WEB MAIL

To make sure your email gets delivered to your AOL inbox, you must add our email address to your Address Book or Custom Sender List.

  1. Click the ’Spam Controls’ link on the lower right side of your inbox screen.
  2. When the ’Mail & Spam Controls’ box appears, click the ’Custom sender list’ link.
  3. Choose the ’allow email from This email address is being protected from spambots. You need JavaScript enabled to view it. and also This email address is being protected from spambots. You need JavaScript enabled to view it. option.
  4. Add the email address you would like to receive mail from, then click ’Add’
  5. Click ’Save’
XPLORNET WEBMAIL

Presently, all e-mail accounts are equipped with a spam filter. To add a sender as “safe”, follow these steps:

  1. Login to Xplornet Webmail.
  2. Click on Settings and expand the menu.
  3. Choose Mail.
  4. Select the Blocking tab.
  5. Add an asterisk (*) to the Safe Sender List.
  6. Click Add.
  7. All e-mails sent to the Xplornet e-mail address will now be sent to the Inbox.
    • The Safe Sender List overrules the Blocked Sender List. So if you bypass the Spam filter by adding the * to the Safe Sender List, even if you add addresses or domains to the Blocked Sender List, they will continue to come to the inbox.
    • If a customer creates a Filter to direct mail that meets certain criteria to the Spam folder, it will be filtered accordingly.xplornet
YAHOO! MAIL

In Yahoo! Mail, log into your email account and follow these steps to add us to your address book. This ensures that you never miss out on any of our emails!

  1. On the main screen, select the ’Add’ link next to the Contacts item, on the left hand side of the page.
  2. A form will appear in the middle of the screen. On this form, enter our name Jasper Place Curling Club and our email address This email address is being protected from spambots. You need JavaScript enabled to view it. and also This email address is being protected from spambots. You need JavaScript enabled to view it. and select ‘Save’

If you’re still not receiving email you are expecting, there are two things you can do:

  1. Use the ’Not Spam’ button in your Bulk folder.
  2. Create a filter to automatically send email from certain domains to your Inbox. This is the only way to really ensure delivery.

    Report as ’Not Spam’

    1. - Check your Yahoo! Bulk folder
    2. - If you see the email from us, highlight it and click ’Not Spam’
    3. - This does not guarantee that your mail will be delivered in the future, but it does help.

    Create a Filter

    1. Click ’Options’ in the top right navigation bar
    2. Select ’Mail Options’ from the list that drops down
    3. Choose ’Filters’ located on the left side of the page
    4. Click the ’Add’ button on the Filters page
    5. Choose the field you want to match in the incoming message. For example, "header" or "to".
    6. Choose the criterion by which you want a match to be made, such as "contains"
    7. Enter the text string to compare. For example: This email address is being protected from spambots. You need JavaScript enabled to view it. and also This email address is being protected from spambots. You need JavaScript enabled to view it.
    8. Choose the destination folder to which you would like the message delivered. For example: Inbox   yahoo1yahoo2 
HOTMAIL LIVE, WINDOWS LIVE AND MSN

In the new Hotmail you must "Mark sender as safe" to enable hyperlinks even in text emails and images in HTML emails.
Entering the email contact in the address book or contacts no longer whitelists the sender.
To ensure messages from specific email addresses are not sent to your Junk Email folder, you can do one of two things:

  1. Check the ’Junk’ folder if you do not see and email from This email address is being protected from spambots. You need JavaScript enabled to view it. and also This email address is being protected from spambots. You need JavaScript enabled to view it. in your inbox
  2. Click the ’Mark as safe’ link
  3. Add This email address is being protected from spambots. You need JavaScript enabled to view it. and also This email address is being protected from spambots. You need JavaScript enabled to view it. to your Safe List.

       Mark Sender as Safe

  1. Click ’Show content’ to view the body of the email if it contains images and HTML
  2. Click ’Mark as safe’
  3. This email address is being protected from spambots. You need JavaScript enabled to view it. and also This email address is being protected from spambots. You need JavaScript enabled to view it. will now be added to your list of ’Safe senders’

      Manually Add to Safe List

  1. Click ’Options’ in the upper right corner of your Hotmail screen
  2. In the Body of the page under ’Junk e-mail’ click the link ’Safe and blocked senders’
  3. Click the link ’Safe senders’
  4. Enter the email address This email address is being protected from spambots. You need JavaScript enabled to view it. and also This email address is being protected from spambots. You need JavaScript enabled to view it.
  5. Click ’Add to list’

hotmail1  hotmail2  

hotmail3  hotmail4

GMAIL

To make sure email gets delivered to your inbox, you must add the email address This email address is being protected from spambots. You need JavaScript enabled to view it. and also This email address is being protected from spambots. You need JavaScript enabled to view it. to your contacts list.

  1. On the main screen, select the ’Contacts’ option in the left hand navigation menu.
  2. On the contacts page, select the ’Add Contact’ button on the top left
  3. On the form that appears, enter our name, St. Albert Curling Club, our email address This email address is being protected from spambots. You need JavaScript enabled to view it. and also This email address is being protected from spambots. You need JavaScript enabled to view it. and select ’Save’ at the top.
  4. A confirmation will appear at the top saying that the contact has been added.

gmail1  gmail2

gmail3  gmail4


SHAW

In Webmail for Shaw, log into your email account and follow these steps to add us to your safe list and to ensure that our emails are not automatically deleted. This ensures that you never miss out on any of our emails!

  1. On the main screen, select the ’Address Book’ tab at the top
  2. This page will list any/all of your contacts within your address book. On this page, at the bottom, enter our name, and our email address This email address is being protected from spambots. You need JavaScript enabled to view it. and also This email address is being protected from spambots. You need JavaScript enabled to view it.
  3. Then, Select ’Add Contact’

shaw1  shaw2  shaw3

Once you see our email listed in your personal address book, it means that we’ve been white listed, and will help ensure that you continue to receive our emails straight to your inbox.

Shaw has the practice of deleting any message that appears to have spam-like qualities, even if you’ve asked to receive them. With this turned on, emails can be deleted automatically without ever been seen. To disable this automatic filter, please follow these steps:

  1. On the main screen, select ’Settings’
  2. Then, select the ’Spam Filter’ link
  3. On this page, you have the ability to adjust your spam filter settings. Select ’Disable Junk Email Filtering’so no emails are blocked or deleted automatically.
  4. Press the ’Save’ Button

shawspam1  shaw2  shawspam3

BELL/SYMPATICO
  1. Using www.bell.ca/ webmail sign in to your Sympatico account.
  2. On the Sympatico web page, click on the Options tab at the top of the page. Select the ’More Options’ link at the bottom of the drop down menu.
  3. On the new page, under ’Junk e-mail’ click the ’Safe and Blocked Senders’ link.
  4. On the next page, click the ’Safe Senders’link.  Enter This email address is being protected from spambots. You need JavaScript enabled to view it. and also This email address is being protected from spambots. You need JavaScript enabled to view it. in the box
  5. Click the ’Add’ button beside it. The screen will refresh and the email address should appear in the Safe List  
ROGERS

In Rogers Mail, log into your email account and follow these steps to add us to your address book. This ensures that you never miss out on any of our emails!

  1. On the main screen, select the ’Add’ link next to the Contacts item, on the left hand side of the page.
  2. A form will appear in the middle of the screen. On this form, enter our name and our email address This email address is being protected from spambots. You need JavaScript enabled to view it. and also This email address is being protected from spambots. You need JavaScript enabled to view it. option. and select ’Save’

If you’re still not receiving email you are expecting, there are two things you can do:

  1. Use the ’Not Spam’ button in your Bulk folder.
  2. Create a filter to automatically send email from This email address is being protected from spambots. You need JavaScript enabled to view it. and also This email address is being protected from spambots. You need JavaScript enabled to view it. to your Inbox. This is the only way to really ensure delivery.

Report as "Not Spam"

  1. Check your Rogers Bulk folder
  2. If you see the email from us, highlight it and click ’Not Spam’
  3. This does not guarantee that your mail will be delivered in the future, but it does help.

Create a Filter

  1. Click ’Options’ in the top right navigation bar
  2. Select ’Mail Options’ from the list that drops down
  3. Choose ’Filters’ located on the left side of the page
  4. Click the ’Add’ button on the Filters page
  5. Choose the field you want to match in the incoming message. For example, "header" or "to".
  6. Choose the criterion by which you want a match to be made, such as "contains"
  7. Enter the text string to compare. For example: This email address is being protected from spambots. You need JavaScript enabled to view it. and also This email address is being protected from spambots. You need JavaScript enabled to view it.
  8. Choose the destination folder to which you would like the message delivered. For example: Inbox
TELUS.NET WEBMAIL

Make sure that our messages arrive in your inbox each
month by adding This email address is being protected from spambots. You need JavaScript enabled to view it. and also This email address is being protected from spambots. You need JavaScript enabled to view it. option.
to your address book and confirm that our newsletter is not spam by reporting so in Telus Webmail.

Add Sender to Address Book

  1. Click on ’Address list’ on the sidebar menu.
  2. Type This email address is being protected from spambots. You need JavaScript enabled to view it. and also This email address is being protected from spambots. You need JavaScript enabled to view it. option. into the text box.
  3. Click ’Save.’

Report non-spam - TELUS Webmail

  1. Open and log into TELUS Webmail.
  2. Select the email(s) you would like to report.
  3. Click on the ’Not Spam’ button above the email(s).
  4. The message will be automatically reported as Not Spam.

telus1

EMAIL CLIENTS

OUTLOOK 2003 (OR HIGHER)

Because of the various email platforms that can work with Outlook, it is tricky to tell you how to recieve all email to your Outlook inbox. We can tell you, however, how to make sure you can see all the emails you receive as they were intended to be seen - with images. If a company is not in your address book or "Safe Sender" list, your HTML images will not display.

To have HTML display correctly, users can:

  • Change their automatic download settings
  • Add sender to your address book
  • Add your email or domain to their approved sender list

To change settings:

  1. Right click on a non-displaying image in an HTML email
  2. Choose ’Change automatic download settings’ option
  3. When the popup comes up, uncheck the first box in the list that says ’don’t download pictures or other HTML content automatically’
  4. Click ’OK’

To add sender to address book:

  1. Open the email
  2. Right click on the from address
  3. Choose ’Add to contacts’ option

To add domain to safe sender list:

  1. From the menu, select ’Tools > Options’
  2. On this screen, in the Preferences tab, select the ’Junk E-Mail’ button.
  3. At the top of this window, select the tab ’Safe Senders’, and push the "Add" Button
  4. In this window, enter our email address, This email address is being protected from spambots. You need JavaScript enabled to view it. and also This email address is being protected from spambots. You need JavaScript enabled to view it. into the box and then press ’OK’.

outlook1  outlook2

outlook3  outlook4

APPLE MAIL FOR OS X
  1. First, if email from This email address is being protected from spambots. You need JavaScript enabled to view it. and also This email address is being protected from spambots. You need JavaScript enabled to view it. ends up in your junk folder, highlight or open it and click "Not Junk" at the top of your screen. Then:
  2. Go to Mail > Preferences from your Mail menu
  3. Go to the Rules tab
  4. Select Add Rule
  5. Give this rule a name such as Newsletters from St. Albert Curling Club.
  6. Create a rule that says "If any of the following conditions are met: ’From’ ’Contains’" and then paste in This email address is being protected from spambots. You need JavaScript enabled to view it. and also This email address is being protected from spambots. You need JavaScript enabled to view it.
  7. From the actions, select "Move message" to mailbox "Inbox"
  8. Click "OK"
BLACKBERRYS
  1. Scroll up to the message header
  2. Get to the field where their name is listed, click the Berry button and then click Show Address
  3. Select and copy that This email address is being protected from spambots. You need JavaScript enabled to view it. and also This email address is being protected from spambots. You need JavaScript enabled to view it. to the clipboard
  4. Go into Address Book and find the user
  5. Select Save
  6. Click to edit it, and then click the Berry button to add another email address
  7. Paste it in and click Save
MOZILLA THUNDERBIRD
  1. Click the Address Book button
  2. Make sure the Personal Address Book is highlighted
  3. Click the New Card button. This will launch a New Card window that has 3 tabs: Contact, Address and Other
  4. Under the Contact tab, copy and paste the "From" address, This email address is being protected from spambots. You need JavaScript enabled to view it. and also This email address is being protected from spambots. You need JavaScript enabled to view it. into the email dialogue box
  5. Click OK

SPAM FILTERS

NORTON ANTISPAM
  1. Start up Norton AntiSpam
  2. Click the Status & Settings tab
  3. Click AntiSpam
  4. Click Configure
  5. Click Allowed List tab
  6. Click Add button
  7. In the ’Email Address’ box, enter This email address is being protected from spambots. You need JavaScript enabled to view it. and also This email address is being protected from spambots. You need JavaScript enabled to view it.
  8. Click OK
  9. Click OK
TREND MICRO

If you received an email message that was incorrectly moved to the Spam Mail folder by the Anti-Spam Toolbar you can prevent this from occuring in the future.

The Anti-Spam Toolbar detects spam by looking for certain keywords in the email’s subject or body and matching it with the anti-spam pattern file. Occasionally, it may detect what you consider legitimate email as spam.

To prevent this from occurring you can do either of the following:

  • Add the sender to the list of Approved Senders
  • Decrease the Spam Email Filter Strength

Note: You can also select the email and click Not Spam to report it to Trend Micro. However, this feature serves only as a reference when we develop our spam database, and it may not have an effect on how the toolbar detects spam.

       Add the sender to the list of Approved Senders

  1. Open Microsoft Outlook or Outlook Express.
  2. Click the Spam Mail folder then select the legitimate email detected as spam.
  3. Click Approve Sender on the toolbar.
  4. Click Yes when the confirmation message appears.

       Decrease the Spam Email Filter Strength

  1. Open Microsoft Outlook or Outlook Express.
  2. Click Trend Micro Anti-Spam then click Settings.
  3. On the Spam Filter tab, move the slider bar to select a lower filter strength.
  4. Click OK to save your settings.
MCAFEE SPAMKILLER
  1. Select Friends from the McAfee SpamKiller sidebar.
  2. Click Add a friend.
  3. Make sure All users at a domain is selected under Friend type:
  4. Type the domain name you want to whitelist under Address:
  5. To whitelist all our newsletters, type This email address is being protected from spambots. You need JavaScript enabled to view it. and also This email address is being protected from spambots. You need JavaScript enabled to view it. but omit the text to the left of the @ symbol
  6. Optionally, enter a rule to help you recognize the domain under our name:
  7. Click OK.
  8. Click OK.
BARRACUDA NETWORKS

The Barracuda Spam Firewall is a popular spam filtering solution. Barracuda uses several algorithms and processes to determine whether emails are spam. Occasionally, it will mark a legitimate message as spam. There are two methods to whitelist email senders so that the firewall will not quarantine future email.

       Whitelist Quarantined Senders

  1. Open your email client. Barracuda should send you a summary each day listing quarantined items. Choose the most recent Barracuda email message.
  2. Locate the email from us and the sender email address This email address is being protected from spambots. You need JavaScript enabled to view it. and also This email address is being protected from spambots. You need JavaScript enabled to view it. that you do not want quarantined in the future. Click on the word "Whitelist," which is in green print to the right of the email title. This will open your list in a web browser.
  3. Click the box to the left of the email that you would like to whitelist. At the top of the page, click "Whitelist." Barracuda will not block or quarantine the sender whose email address appears on the whitelist.

       Whitelist Senders and Domains

  1. Open your web browser. Navigate to your company’s Barracuda firewall homepage.
  2. Click on the "Block/Accept" tab.
  3. Choose "Sender Domain Block/Accept." Enter the domain name from This email address is being protected from spambots. You need JavaScript enabled to view it. and also This email address is being protected from spambots. You need JavaScript enabled to view it. to whitelist. For example, you can enter aol.com to allow all AOL addresses. You may enter a comment to remind you why you allowed this domain. Click "Add."
  4. Click your mouse on the "Email Sender Block/Accept" tab. Enter the email address of an individual sender that you want to whitelist, such as " This email address is being protected from spambots. You need JavaScript enabled to view it. and also This email address is being protected from spambots. You need JavaScript enabled to view it. " Include a comment. Click "Add." In the future, Barracuda will not block emails from this sender.
CLOUDMARK SPAMNET
  1. Select Cloudmark | Options... from the Cloudmark SpamNet toolbar in Outlook.
  2. Click Advanced.
  3. Go to the Whitelist tab.
  4. Click the Add button.
  5. Type: This email address is being protected from spambots. You need JavaScript enabled to view it. and also This email address is being protected from spambots. You need JavaScript enabled to view it.
  6. Click OK.
  7. Click OK.
  8. Click Yes.
  9. Click OK.
MAILBLOCKS
  1. Click the Addresses tab.
  2. Click New.
  3. Type: This email address is being protected from spambots. You need JavaScript enabled to view it. and also This email address is being protected from spambots. You need JavaScript enabled to view it.
  4. Make sure ’Accept Mail From This Address’ is selected under Receiving Options.
  5. Uncheck ’Display in People Picker’ under Other options.
  6. Click Submit.
  7. Click OK.
MAILSHIELD
  1. Click Friends from the toolbar.
  2. Click Add.
  3. Type: This email address is being protected from spambots. You need JavaScript enabled to view it. and also This email address is being protected from spambots. You need JavaScript enabled to view it.
  4. Click OK.
MAILWASHER
  1. Click Tools, then Blacklist & Friends.
  2. Click Add... on the right, the Friends list side.
  3. Make sure Plain email address is selected.
  4. Type: This email address is being protected from spambots. You need JavaScript enabled to view it. and also This email address is being protected from spambots. You need JavaScript enabled to view it.
  5. Click OK.
  6. Click OK.
ODDPOST
  1. Check your ’Probably Spam’ folder.
  2. If you see that our newsletter was incorrectly filtered out
  3. Select it
  4. Click the ’Move to Inbox and Mark as Not Spam’ button.
SPAMASSASSIN
  1. Add the following entry to your user_prefs file, which is found in the .spamassassin subdirectory on your web/mail server
  2. whitelist_from This email address is being protected from spambots. You need JavaScript enabled to view it. and also This email address is being protected from spambots. You need JavaScript enabled to view it.
  3. Save the user_prefs file or move the updated copy to your .spamassassin subdirectory.
SPAMFIGHTER

Highlight the email from us with the email address This email address is being protected from spambots. You need JavaScript enabled to view it. and also This email address is being protected from spambots. You need JavaScript enabled to view it. to Whitelist.

Click "More" in the SPAMfighter Toolbar and select "Whitelist".

Here you can choose if you want to Whitelist the email address This email address is being protected from spambots. You need JavaScript enabled to view it. and also This email address is being protected from spambots. You need JavaScript enabled to view it. or the whole domain.

To be sure that all emails from people in your Outlook contacts get through to you, you can import and Whitelist them.

To do this, follow these steps:

  1. Click "More" in the SPAMfighter toolbar.
  2. Then "Options"
  3. Then "Filter settings"
  4. Then "Blacklists & Whitelists"
  5. Then "Whitelist email address"
  6. Then "Import".
  7. Select your ’Address Book’ and click on "Check all"
  8. Click "Add"
  9. Click "Apply"

If you get a pop-up box offering you to upgrade to SPAMfighter Pro it is because you have exceeded the limit of 100 addresses. You can fix this by buying SPAMfighter Pro or by deleting some of the addresses in your Black/White list. If you want delete addresses, please go to:

  1. Click More" in the SPAMfighter toolbar.
  2. Then "Options"
  3. Then "Filter settings"
  4. Then "Blacklists & Whitelists"
SPAM ARREST
  1. Open Spam Arrest
  2. Add the sender email address This email address is being protected from spambots. You need JavaScript enabled to view it. and also This email address is being protected from spambots. You need JavaScript enabled to view it. to your authorized senders list.
CHOICEMAIL
  1. Open ChoiceMail
  2. Click on the Senders tab
  3. Choose "Approve another Sender"
  4. Type in the sender email address This email address is being protected from spambots. You need JavaScript enabled to view it. and also This email address is being protected from spambots. You need JavaScript enabled to view it.
  5. Click on OK
SPAMBUTCHER
  1. Click the Configure button.
  2. Go to the Known Senders tab.
  3. Click Add under ’Known Good Senders and Recipients’.
  4. Type: This email address is being protected from spambots. You need JavaScript enabled to view it. and also This email address is being protected from spambots. You need JavaScript enabled to view it.
  5. Click OK.
  6. Click OK.
SPAMEATER PRO
  1. Click Filters from the sidebar.
  2. Click the Approved Senders tab.
  3. Click Add Filter.
  4. Type: This email address is being protected from spambots. You need JavaScript enabled to view it. and also This email address is being protected from spambots. You need JavaScript enabled to view it. under Address.
  5. Choose ’Full Email Address’ under Address Type.
  6. Select Email Domain.
  7. Click OK.
SPAM INSPECTOR
  1. Select Spam Inspector
  2. Then ’Manage Friends List’ from either the Spam Inspector toolbar or from the Outlook menu.
  3. Make sure Email is selected under ’Add a New Friend’.
  4. Type: This email address is being protected from spambots. You need JavaScript enabled to view it. and also This email address is being protected from spambots. You need JavaScript enabled to view it.
  5. Click the >> button.
  6. Click Close.
SPAM INTERCEPTOR
  1. Follow the Trusted link under > Authentication Lists.
  2. Enter the email address: This email address is being protected from spambots. You need JavaScript enabled to view it. and also This email address is being protected from spambots. You need JavaScript enabled to view it.
  3. Click Add.
SPAMPAL
  1. Click on the SpamPal system tray icon with the right mouse button.
  2. Click ’Add to Whitelist’ from the menu.
  3. Type: This email address is being protected from spambots. You need JavaScript enabled to view it. and also This email address is being protected from spambots. You need JavaScript enabled to view it.
  4. Click Add.
SPAM SLEUTH
  1. Select File, then Configure.
  2. Go to the Friends category.
  3. Make sure Active is checked.
  4. Type: This email address is being protected from spambots. You need JavaScript enabled to view it. and also This email address is being protected from spambots. You need JavaScript enabled to view it. on a line by itself in the entry field.
  5. Click OK.
OTHER SPAM FILTERS NOT LIST ABOVE....

If our message is being filtered, try adding This email address is being protected from spambots. You need JavaScript enabled to view it. and also This email address is being protected from spambots. You need JavaScript enabled to view it. to your Address Book or Contact list.
If messages continue to be sent to your junk folder contact your ISP or spam filter application support and ask how to whitelist This email address is being protected from spambots. You need JavaScript enabled to view it. and also This email address is being protected from spambots. You need JavaScript enabled to view it. 


What’s the story behind the new face of the Jasper Place Curling Club?

The JPCC Board of Directors and GM Cathy Craig see this spectacular, 180-foot-long, 14-foot-high wall mural as a defining feature of our club for many, many years to come.

Having such a high-calibre artwork on the club’s prominent north wall has been a vision of Cathy’s for almost a decade. Colin Vince, a long-time icemaker at the club, shared Cathy’s vision through those years when the club simply couldn’t afford a public work of art of this magnitude.

In a strange way, COVID-19 helped turn Cathy’s vision into reality. The plan was to have the mural as the finishing touch on the JPCC Building Project, announced several years ago. JPCC curlers will remember the raffle ticket drives held in 2020 and the updates offered throughout that curling season about plans for the building project.

COVID-19 came along, however, putting the building project on hold temporarily and interrupting the livelihoods of many people – including artists. Edmonton artist Jill Stanton, one of North American’s shining stars of public art murals, found she had a window in her work calendar – long enough for JPCC, with the help of a grant to offset costs, to hire Jill through July and August 2021 to design and paint the artwork. Jill has painted more than 60 murals throughout North America. We are proud of her successes and delighted with the unique mural she created for us.

Take a few minutes to stand back and appreciate the design. Jill was asked to represent curling and its history at JPCC in bold, unique ways while also representing the club’s neighbouring communities. The larger-than-life result reflects the club’s confidence in our future and invites friends, neighbours and would-be curlers into our house.

JPCC is now celebrating the mural as the official launch to the building project.

IMG 3477 


Check out the latest story about our amazing mural here


Thank you for your interest in becoming a member of the  Jasper Place Curling Club.

If you were a member last season, you already have an account.  Please Sign-in and renew your membership.

In order to be set up quickly as a new member, there are a few things you need to know.

  1. Completing our on-line form:
  • If you want to register as a group (ie. team, spouses, family, etc) each person must be entered individually and you will need a unique username and email address for each individual. Users cannot share an email address.
  • If you are registering on behalf of a child/minor, the request for membership must be made on behalf of the child/minor.  Please use the child's first and last name, gender and birthdate and provide a unque email address for your child's account.  Note that you may use the Guardian's contact information for the rest of the form.
  • Gender and Birthdate are required for all members to determine league and program eligibility. 
  • All mandatory fields are marked as such, but we would appreciate as many of the other fields being completed as possible as it helps us provide a better experience for you as a new member and to continually improve our club for all our members.
  1. You will be sent a verification email to the address you provided. Please click on the verification link to allow your request to proceed. 
  2. You will receive an email shortly thereafter with simple instructions that will allow you to log into the Jasper Place Curling Club website and complete your league(s) sign-up.

We look forward to having you join our club!

Proceed With Membership Request


Member Login

Upcoming Events

26 Apr 2024;
12:01PM - 08:30PM
Garage Sale

League Schedules

League schedules, teams and results can all be found in the members section of the website once you LOGIN.

Contact Us

16521 107th Avenue
Edmonton, Alberta Canada T5P 0Y1

(780) 489-6428 

DIRECTIONS

Follow Us

FacebookTwitterinstagramYouTube

Treaty 6 Territory Acknowledgement

The Jasper Place Curling Club respectfully acknowledges that we are located on Treaty 6 territory, a traditional gathering place for diverse Indigenous peoples including the Cree, Blackfoot, Metis, Nakota Sioux, Iroquois, Dene, Ojibwe, Saulteaux, Anishinaabe, Inuit, and many others whose histories, languages, and cultures continue to influence our vibrant community.